Mozilla Thunderbird is free and open-source email client software. Below are instructions to configure Thunderbird for RU MS365 mail and for Science mail.
Configure Thunderbird for RU MS365 mail.
The RU MS365 instructions do not mention Thunderbird, but there is a RU created set of instructions (pictures in Dutch).
Configure Thunderbird for Science mail.
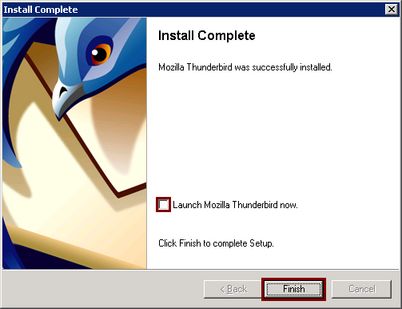
NB: For a self managed pc after installing Thunderbird you’ll have to uncheck Launch Mozilla Thunderbird now
and click Finish.
Create a profile
NB: If you installed or used Thunderbird previously without creating a profile, please first read Thunderbird#Thunderbird_opgestart_zonder_eerst_een_profiel_aan_te_maken.
Start the profile manager, go to Start -> 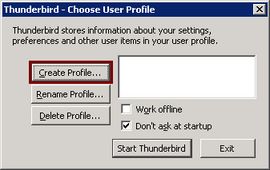
Manager.
Click Create Profile….
Click Next. At Enter new profile 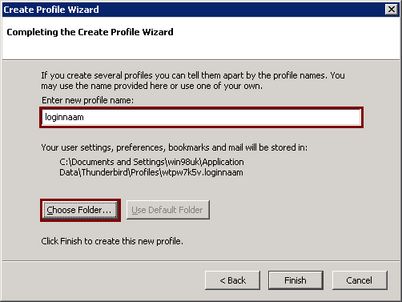
Click Choose Folder… to create a directory 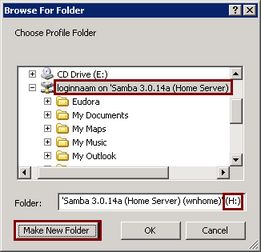
Click Make New Folder and give it a name, 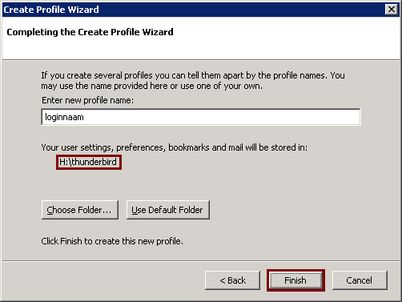
preferences, bookmarks and mail will be stored in:
you read something like H:\thunderbird or the cosen new
directory on the H: drive. Click
Finish, a profile has been created.
Start Thunderbird for the first time
Start Thunderbird by clicking double on the profile name. After that, Thunderbird can also be started with the desktop icon. The first time starting Thunderbird may tape several minutes, be patient, next times it wille be faster.
Account Wizard
Thunderbird starts with the Account Wizard.
Select Email account and click Next. At
Your Name, fill in your name as you want others to see it
in the “From:” line. At Email address fill in your email address
or one of your alternate mail addresses as listed on the DIY website after:
“Mail address:” or after “Also accepted addresses”.
Click Next. At Select the type of
incoming server you are using check the option
IMAP. At Incoming Server fill in what DIY lists as
“Imap/pop mailserver:”. At Outgoing Server fill in:
smtp.science.ru.nl
Click Next. At Incoming User Name fill in 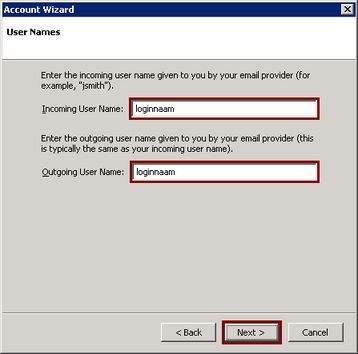
Clock Next. At Account Name leave it 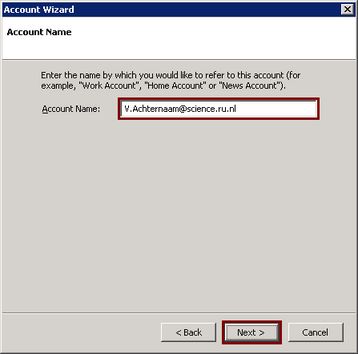
- Your mail address - or fill in a descriotive name.
Click Next. Check the summary of the 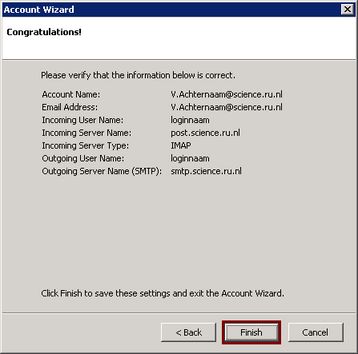
Clock Finish. The alert window
appears. This has nothing to do with “Maximum
number of connections”, but with settings that are not correct,
which makes a connection with the mailserver impossible.
Click OK.
Pick options
The main Thunderbird window appears. Hit the menu bar to go to Tools -> Options…. Select Composition in the top of the Options window and go to the General tab. Many people prefer forwarding in the body over forwarding as attachment.
Change Forward messages via the drop-down
from As Attachment to Inline. Go to the tab
Addressing. It is often useful to keep the
addresses of people tou send mail to,
separate from the personal address book.
Change at Automatically add
outgoing email addresses to my with the drop down
Personal Address Book in Collected Addresses.
Account settings
Go with the menu bar to Tools -> Account Settings….
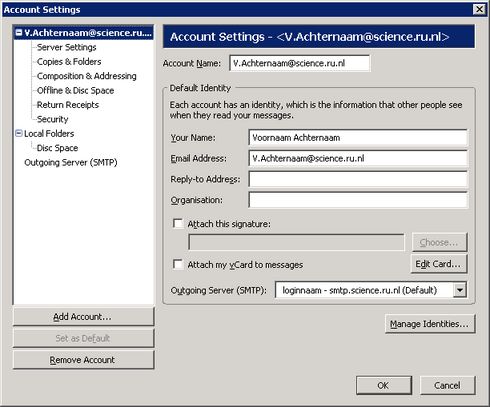
Click Server Settings under the newly created account. In the Security Settings box change Use secure connection to SSL.
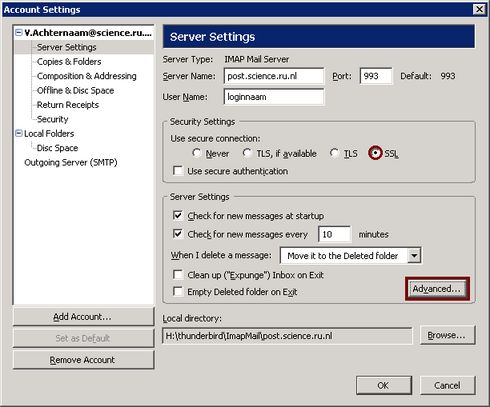
Click Advanced…. Uncheck Show only subscribed folders. If you do not want your folders in the inbox, then fill in INBOX. (note the final dot) at IMAP server directory in.
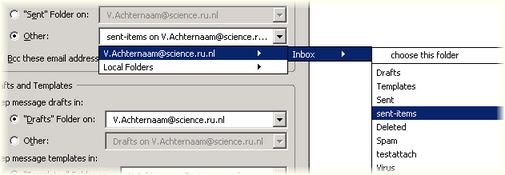
Click OK. Click Copies & Folders under the account just created.
The standard settings often are ok. If you have a different Sent folder and would like to keep using that, you can specify which folder at the Other choice bullet.
Click Composition & Addressing under the account just created. Probably you’ll want to have the answer in a reply above the original message. To do that, at Automatically quote the original message when replying then change in the drop-down menu start my reply below the quote in start my reply above the quote.
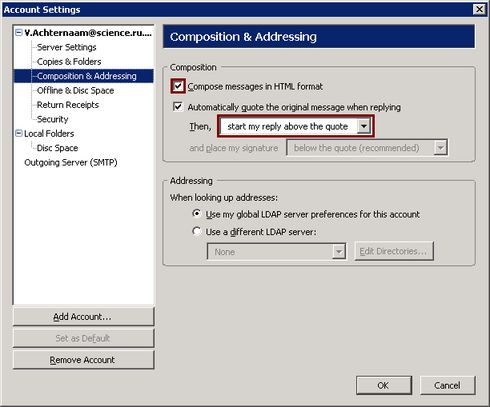
If you want to write emails in “plain text”, then uncheck Compose messages in HTML format.
Select Outgoing Server (SMTP).
Click Edit…. Select the
choice bullet at TLS, if available.
Change when necessary the port number, at
Port in
587, see the
<a href="email_authsmtp" title="wikilink">{=html}Settings for
Authenticated SMTP</a>{=html} manual for more information. You
can fill in a Description. This can be handy when using several smtp servers.
For newer versions of Tunderbird when using port 587: Choose “connection security” “STARTTLS” and make sure that “use secure authentication” is unchecked.
Close the Account Settings window by clicking OK.
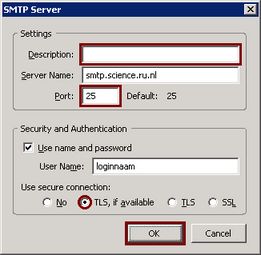
Accountinstellingen controleren.
Selecteer onder de accountnaam Inbox, en klik op Get 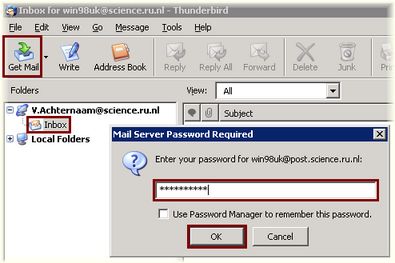
Vul waar gevraagd het wachtwoord in, en klik op OK. 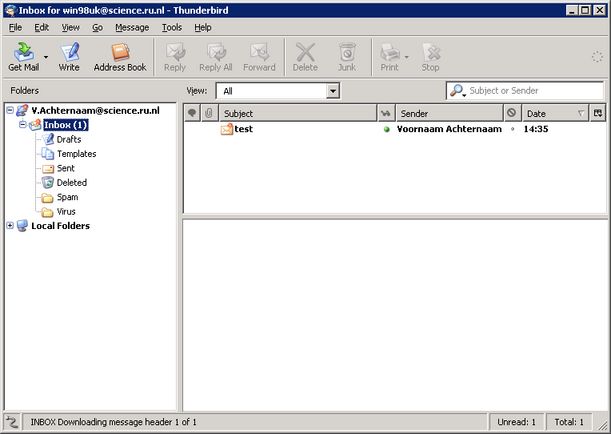
uit te vouwen. Er zouden nu ten minste 2 mappen, met de
naam “Virus” en “Spam” moeten staan. Klik op Write,
vul bij To: Uw e-mailadres in, als Subject: b.v.
test. Klik nu op Send. Klik weer op Get Mail. Als
alles goed is heeft U nu het testmailtje in Uw Inbox.
Thunderbird opgestart zonder eerst een profiel aan te maken
Er is nog niets gedaan in Thunderbird - alleen een keer opgestart, account wizard niet doorlopen
Als er nog niets met Thunderbird gedaan is, en U hier absoluut zeker van bent kunt U het profiel veilig verwijderen. Volg dan de volgende stappen.
Ga naar de Thunderbird profile manager 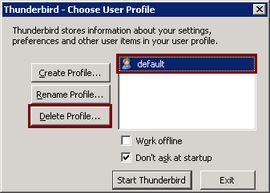
Thunderbird -> Profile Manager.
Klik op Delete Profile… Klik op 
U kun nu zonder problemen de handleiding voor het instellen van een Email account volgen.
Er zitten al gegevens in Thunderbird die behouden of verhuisd moeten worden
Als U het profiel wilt verplaatsen naar een goede locatie, volg dan de volgende stappen.
Zoek eerst het profiel op en lees de [#3
uitleg] Verplaats de profile directory naar een
goede locatie. B.v. van C:\Documents and
Settings\loginnaam\Application
Data\Thunderbird\Profiles\uy1yi71r.default
naar H:\thunderbird.
Ga naar de Thunderbird profile manager Klik op 
Profile Manager.
Klik op Delete Profile… Als U het
onderstaande venster krijgt, klik dan op Don’t 
directory goed verplaatst is.
En klik op Create Profile….
Klik op Next. Vul bij Enter new profile 
(zolang het invulveld maar niet leeg is).
Klik op Choose Folder… om de map te kiezen 
H:\thunderbird. Blader naar de map toe.
Selecteer de map, en klik vervolgends op OK. 
preferences, bookmarks and mail will be stored
in: de goede map geselecteerd is. Klik op
Finish.
Thunderbird starten Start Thunderbird door op de
profielnaam te dubbelklikken. In het vervolg kan
thunderbird ook via het dektop icoon gestart
worden.
Profielen
Er zijn 2 soorten profielen die op deze pagina genoemd worden. Dit is het Windows gebruikersprofiel en het Thunderbird profiel.
Het Windows gebruikersprofiel
Dit zijn de Windows instellingen die op een server worden gebackupt indien U een beheerde werkplek PC heeft. Het Windows gebruikersprofiel staat op de systeempartitie (meestal de C: schijf) in een subdirectory van Documents and Settings genoemd naar Uw loginnaam. Zie het onderstaande voorbeeld.
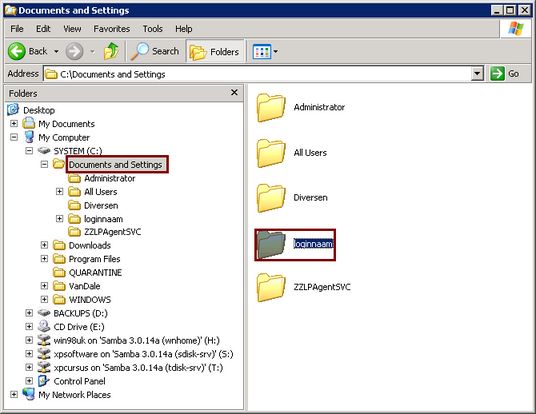
Als er in deze pagina verder nog verwezen wordt naar “profiel” wordt, indien niet verder aangegeven het Thunderbird profiel bedoeld.
Het Thunderbird profiel
Dit is de verzameling instellingen en gegevens van Thunderbird opgeslagen in een directory. Gegevens die zoal hierin staan zijn contactpersonen, van welke server mail opgehaalt moet worden, eventueel lokaal opgeslagen emails, enz. Een profiel wordt standaard aangemaakt in Uw Windows profiel. Dit is voor thuisgebruik goed, maar Uw lokale mail en instellingen worden niet ge-backupped! In het geval van een beheerde werkplek wordt dit ook op deze lokatie ge-backupped - maar de ruimte is hier zeer beperkt. Daarom moet Uw Thunderbird profiel in principe op een netwerkschijf staan die gebackupped wordt. In dit de verdere FAQ’s wordt ervanuitgegaan dat de ge-backuppede lokatie waar U Uw Thunderbird profiel wilt -of- heeft opgeslagen Uw homedirectory is.
Om de achter de lokatie te komen waar nu uw profiel opgeslagen is, doe het volgende:
Ga naar de Thunderbird profile manager, Start -> Programs 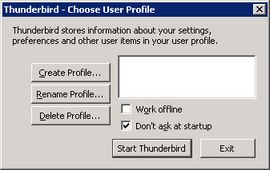
Is deze leeg, dan heeft U nog geen Thunderbird profiel.
U kunt dan zonder problemen de
handleiding voor het instellen van een Email account volgen.
De onderstaande punten hoeven dan niet doorlopen te
worden. Is er wel een profiel naam aanwezig, zoals in de
onderstaande afbeelding - sluit de profile manager door op
Exit te klikken en ga dan verder met de onderstaande
stappen.
Zorg dat verborgen bestanden zichtbaar zijn. Open My Computer op het bureaublad. Ga via het menu naar Tools - Folder Options…, selecteer het View tabblad.
Selecteer bij Hidden files and folders het keuzebolletje
Show hidden files and folders. Deze optie kan waar
teruggezet worden wanneer het bekijken / verhuizen /
verwijderen van het profiel klaar is. Klik op OK.
Bekijk het profiles.ini bestand. Ga naar Uw “Windows
gebruikersprofiel directory”, Application Data en
vervolgens Thunderbird. B.v. “C:\Documents and
Settings\loginnaam\Application Data\Thunderbird”. In
deze directory staat een profiles.ini. Dit bestand
verwijst naar de locatie waar het profiel opgeslagen is.
Open het bestand door hierop te dubbelklikken. In dit
bestand staan twee regels die nu relevant zijn. Achter
IsRelative zal of 0 of 1 staan. Bij Path zal
een relatief - bij een IsRelative waarde van 1, of absoluut
pad - bij een IsRelative waarde van 0, staan.
IsRelative = 1 Path waarde is Profiles/<directory
naam> waarbij “directorynaam” staat voor een willekeurige
letters-met-cijfers combinatie met “.default” erachter.
Hieronder een voorbeeld waarbij het profiel onder het
Windows-profiel staat - dit is, voor niet-thuissituaties,
niet goed! Het Path is hier
Profiles/uy1yi71r.default. De locatie van het profiel is
de directory waarin het profiles.ini bestand zich bevind
met eraanvast de waarde van Path. De locatie van het
profiel is bij dit voorbeeld C:\Documents and
Settings\loginnaam\Application
Data\Thunderbird\Profiles\uy1yi71r.default
IsRelative = 0 Path waarde is het volledige pad naar
de profiel directory In het volgende voorbeeld staat het
profiel op de homedirectory. De Path regel heeft de
waarde H:\thunderbird. De locatie van het profiel is de
waarde van Path, in dit voorbeeld H:\thunderbird
Hoe stel ik een LDAP adresboek in?
U kunt het Science LDAP adresboek toevoegen door de onderstaande stappen uit te voeren.
Activeer en open de directory servers lijst Ga via het
menu naar Tools -> Options…. Selecteer bovenin het
Options venster Composition, ga naar het tabblad
Addressing. Vink Directory Server aan, en klik op
Edit Directories….
Voeg een nieuwe toe.
Klik op Add. Vul bij het Directory Server 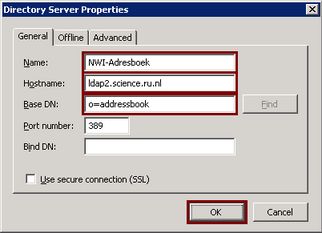
Name een beschrijvende naam, b.v.:
Science-Adresboek Hostname :
ldap.science.ru.nl Base DN : o=addressbook
Port number heeft als defaultwaarde al 389 -
hoeft niet veranderd te worden. En klik alle openstaande
optie vensters met OK dicht.
Use the Science Address Book
The LDAP address book can be used in two places.
Use LDAP Address Book from “Address Book”
In the main window, click the button Address Book
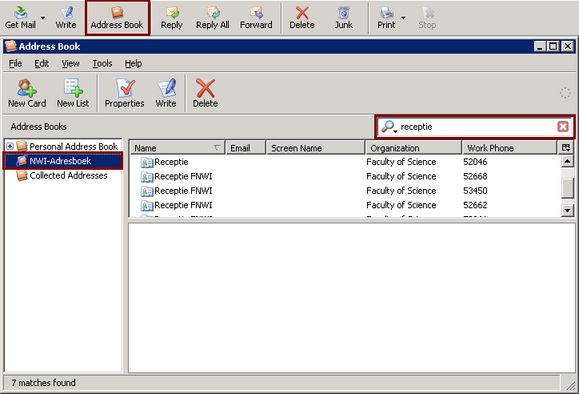
On the left side you see a list of available address books. This includes the Science-Adressboek, clock this. If you enter part of a name or of a mail address in the search window, the window below fills with up to 100 matches.
Use LDAP Address Book from a “Compose” window
In the main window, click Write
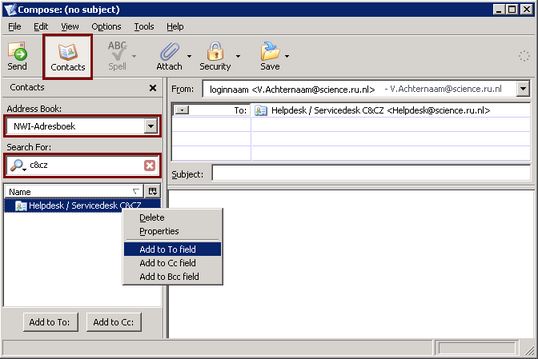
A Compose window appears. Click Contacts and select at Address Book the Science-Adresboek. If you enter part of a name or of a mail address in the search window, the window below fills with up to 100 matches.
Remarks
Not al items in the address book have an email address. If you want to know what attributes an item has, right-click an item and select Properties.
Because of security, you can’t change items in the LDAP address book, but you can make a copy in a local address book by dragging an item from the “Science-Adresboek” to e.g. the “Personal Address Book”. The LDAP address book can omnly be reached from RU campus or when connected with VPN.
Tips / tricks
Add-ons
Add-ons are small pieces of software that can add new features or tiny tweaks to your Thunderbird. See the Thunderbird Add-ons page.
How to change font size in From and To lines in ThunderBird
- Click on Menu bar -> Tools -> Add-ons
- Click on “Get Add-ons”
- Search for Add-on “Theme Font & Size Changer”
- Install. Add-on provides a ’Restart now" item.
- Restart Thunderbird
- Click on Menu bar -> Tools -> Theme Font & Size Changer